Simple Bead Drop Earrings on Headpins
Stack three beads on a headpin, turn one simple loop and hang the drop from a hook ear wire. The loop is taught in three moves: bend, trim, roll.

Tutorial at a glance
Materials
- 2 flat-head headpins, 2 in (50 mm), about 22-gauge (0.64 mm), plus a few spares
- 2 hook ear wires
- 2 round beads, 8 mm
- 4 round beads, 4 mm
- Round-nose pliers
- Chain-nose pliers
- Wire cutters
- Ruler and bead mat
Bead drop earrings are the shortest route into earring making: a few beads stacked on a headpin, one loop at the top, and a hook ear wire to hang it from. There is no stringing and no knotting. The only real skill is the simple loop, and it breaks down into three moves: bend, trim, roll.
What you need
- 2 flat-head headpins, 2 in (50 mm) long, about 22-gauge (0.64 mm), plus two or three spares for practice
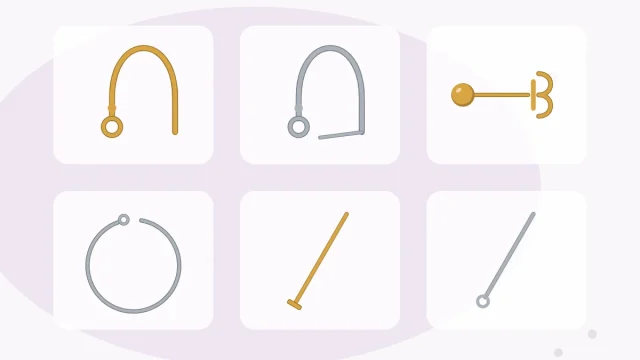
- 2 hook ear wires with an open loop at the bottom
- 2 round beads, 8 mm
- 4 round beads, 4 mm
- Round-nose pliers, chain-nose pliers and wire cutters (flush cutters give the cleanest end)
- A ruler and a bead mat
- Optional: a fine-tip marker for marking the plier jaw
If the names of these parts are new, the guide to earring findings shows what each one looks like. Before starting, drop each bead onto a headpin: the flat head has to be wider than the hole. If a bead slides straight off, put a small seed bead on first as a stopper, and do the same on the second earring.
Finished size and the wire arithmetic
Each earring carries a stack of one 4 mm bead, one 8 mm bead and one 4 mm bead. That stack is 4 + 8 + 4 = 16 mm tall. A simple loop needs about 3/8 in (10 mm) of wire above the last bead, so the earring uses 16 + 10 = 26 mm of the 50 mm headpin, and the remaining 24 mm or so is trimmed away.
Ten millimeters of wire curls into a loop roughly 1/8 in (3 mm) across, so the finished drop measures about 3/4 in (19 mm) from the head of the pin to the top of the loop. With a typical hook ear wire the whole earring hangs about 1.5 in (38 mm) from the ear, depending on the shape of the hook.
To resize, change the stack. The rule is that stack height plus 10 mm must be shorter than the headpin. Long, heavy stacks pull on the ear, so keep a first pair under about 1 in (25 mm) of beads; the overview of bead materials and shapes points out lighter options for larger drops.
Make the loop in three moves
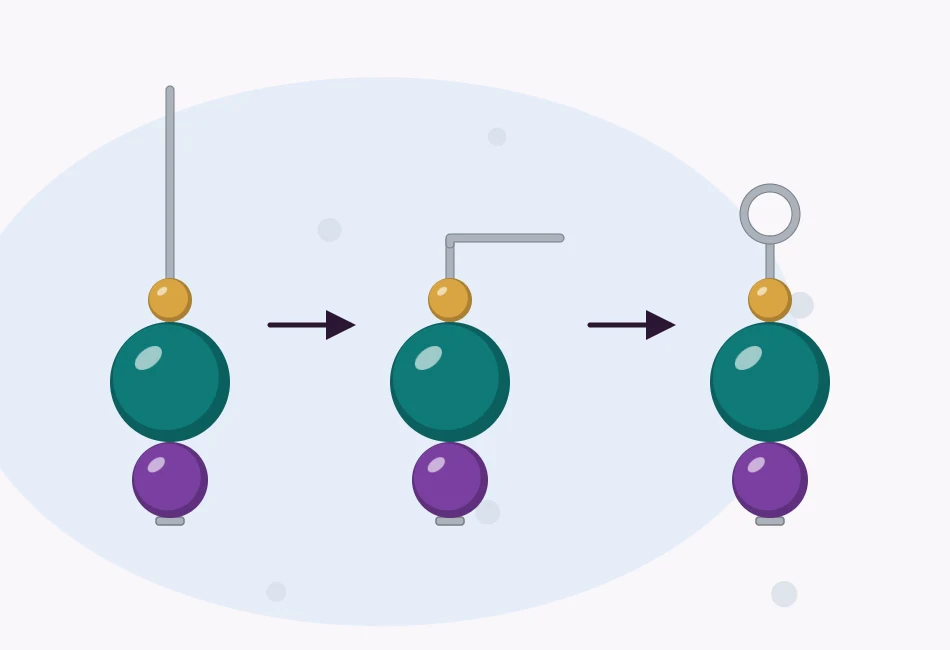
- Stack the beads. Slide a 4 mm bead, an 8 mm bead and a second 4 mm bead onto a headpin. Hold the pin upright so the beads rest on the head with no gaps between them.
- Bend. Grip the wire with the chain-nose pliers directly above the top bead. With a finger, push the wire over the edge of the jaw until it lies at a right angle to the stack. The thickness of the jaw leaves a hair of space above the bead, which lets the finished loop sit centered instead of jamming against the bead.
- Trim. Measure 3/8 in (10 mm) along the bent wire, starting at the bend, and cut there. Turn the flat side of the cutters toward the earring so the end of the wire is square rather than pointed. Cup a hand over the offcut so it cannot fly.
- Roll. Grip the very tip of the wire in the round-nose pliers, about one third of the way down the jaws. No wire should poke out beyond the jaw. Roll the wrist so the wire curls up and back over the top bead. Loosen the grip, rotate the pliers back, grip again and keep rolling until the tip meets the bend.
- Center and close. Look at the loop from the side. It should stand directly over the stack, not lean to one side. If it leans, grip the loop flat in the chain-nose pliers and tilt it back. Leave the loop a tiny bit open for now.
Tip
Round-nose jaws are cones, so the loop size depends on where the wire is gripped. Draw a thin marker line around one jaw at the chosen spot and grip there every time. Every loop then comes out the same size.
Attach the drop to the ear wire
The loop at the bottom of a hook ear wire opens like a tiny door. Grip the cut end of that loop with the chain-nose pliers and twist it sideways, toward or away from the body, just far enough to make a gap. Never pull the loop outward into a wider circle, because it will not return to a neat round shape. This is the same sideways twist used for opening and closing jump rings.
Hook the bead drop onto the open loop and twist the loop shut until the end clicks past and settles back level. Then close the loop on the bead drop itself: squeeze gently across it with the chain-nose pliers until the tip touches the stem.
Make the second earring match
A pair looks matched when three things agree: the bead order, the loop size and the direction the drop faces.
- Work in stages, not one earring at a time: stack both pins, bend both, trim both, roll both.
- Trim against the ruler rather than by eye, so both wires are 10 mm long.
- Roll both loops at the marked spot on the plier jaw.
- Hold the finished drops side by side by their loops. If one hangs lower, its loop is larger: unroll it a little, snip off a sliver of wire and roll it again.
If something goes wrong
| What happens | Likely cause | What to do |
|---|---|---|
| The loop is shaped like a teardrop | The tip of the wire stuck out past the jaw | Grip the last millimeter again and curl it in, or start over on a spare pin |
| The loop leans to one side | The bend was less than a right angle | Hold the loop flat in the pliers and tip it back over the stack |
| The drop falls off the ear wire | A gap was left in one of the loops | Close both loops until the wire ends touch |
Wire weakens each time it is rebent, so start a spare pin rather than reworking one repeatedly. More on wire thickness and hardness is in this overview of jewelry wire gauges.
Watch out
Beads, headpins and wire offcuts are small parts. Clear trimmed wire ends off the mat as they are cut, keep everything away from young children and pets, and supervise children who are beading.
A matching pendant
Make a third, slightly longer drop and hang it on a cord. The beaded pendant necklace tutorial uses exactly the same loop, so the earrings and necklace form a set.
Frequently asked questions
How much wire does a simple loop need?
About 3/8 in (10 mm) of wire above the last bead. That length curls into a loop roughly 1/8 in (3 mm) across. Trimming both earrings to the same length is what makes the loops match.
What size headpins are used for bead drop earrings?
Headpins 2 in (50 mm) long in about 21- to 24-gauge wire suit most small drops. The bead stack plus 10 mm for the loop has to be shorter than the pin, and the wire has to fit through the bead holes.
Why does the loop come out as a teardrop instead of a circle?
Usually the tip of the wire was sticking out past the plier jaw, so the last bit stayed straight. Grip the very end of the wire with nothing poking out, then roll.
How are the two earrings kept the same length?
Work in stages on both at once, trim both wires against a ruler, and roll both loops at the same marked spot on the round-nose pliers. Compare them hanging side by side before closing the loops.