Beaded Pendant Necklace: Make a Bead Drop and Hang It on Cord
Stack three beads on a headpin, roll a simple loop and hang the drop from a jump ring on cord or chain. Includes a tied cord and an adjustable sliding-knot finish.

Tutorial at a glance
Materials
- 1 headpin, 2 in (50 mm), 21 to 24 gauge
- 1 round bead, 6 mm
- 1 focal bead, 10 mm
- 1 round bead, 4 mm
- 1 jump ring, about 6 mm, 20-gauge (0.8 mm)
- 32 to 34 in (81 to 86 cm) of cord about 1 mm thick, or a ready-made chain
- Round-nose pliers, chain-nose pliers and wire cutters
- Scissors and a ruler
A beaded pendant necklace needs only three beads, one headpin and a length of cord, which makes it one of the quickest ways to learn the simple wire loop. The beads are stacked on the headpin, the wire above them is rolled into a loop, and the finished drop hangs from a jump ring on a cord or a ready-made chain.
What you need
- 1 headpin, 2 in (50 mm) long, 21 to 24 gauge, with a flat or ball end
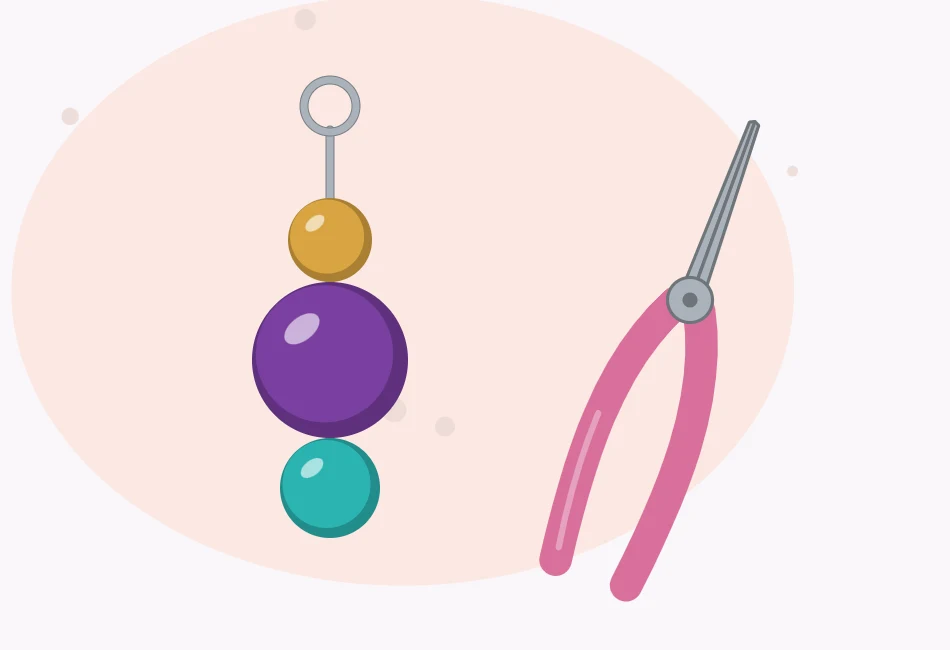
- 3 beads for the drop: one 6 mm round, one 10 mm round or faceted focal bead, and one 4 mm round
- 1 jump ring, about 6 mm across, in 20-gauge (0.8 mm) wire
- Cord about 1 mm thick, such as waxed cotton cord: 32 in (81 cm) for a simple tied necklace or 34 in (86 cm) for an adjustable one. A ready-made chain also works.
- Round-nose pliers, chain-nose pliers and wire cutters
- Scissors and a ruler
- Two or three spare headpins for practice loops
The head of the pin must be wider than the hole of the bottom bead. If the bead slides off, thread a small 3 mm bead or a size 8/0 seed bead on first to act as a stopper. The guide to headpins, eye pins and other findings covers the pin types and gauges in more detail.
Finished size and the wire arithmetic
Stack the beads from the bottom up: 6 mm, then 10 mm, then 4 mm. Together they cover 6 + 10 + 4 = 20 mm of the headpin. A 2 in headpin is 50 mm long, so 50 − 20 = 30 mm of bare wire stands above the top bead.
A simple loop uses about 3/8 in (10 mm) of wire. That means roughly 20 mm is trimmed away and 10 mm is rolled. The finished drop is the 20 mm bead stack plus a loop about 4 mm tall, so it hangs close to 1 in (25 mm) long.
To change the size, swap the beads and redo the sum. Any stack up to about 1.5 in (38 mm) tall still leaves enough wire on a 2 in headpin.
Make the bead drop
- Stack the beads. Slide the 6 mm bead, the 10 mm bead and the 4 mm bead onto the headpin. Hold the pin upright so the beads sit down against the head with no gaps.
- Bend the wire. Grip the wire with chain-nose pliers directly above the top bead and bend it over to a right angle, so it points sideways like an upside-down letter L.
- Trim. Measure 3/8 in (10 mm) from the bend and cut the wire there. Point the end down toward the mat and cover it with a finger while cutting, because the offcut can fly.
- Roll the loop. Grip the very tip of the wire in the round-nose pliers, about a third of the way down the jaws. Turn the wrist to roll the wire back toward the bend. Release, grip again and keep rolling until the tip meets the bend and the circle is closed.
- Center it. Look at the loop from the side. It should sit directly above the beads. If it leans, tip it back with chain-nose pliers, and squeeze gently to close any gap where the tip meets the stem.
Tip
Draw a line of permanent marker on the round-nose pliers where the loop size looks right, and grip at that mark every time.
Hang the drop
A jump ring connects the drop to the cord and lets it swing. Hold the ring with one pair of pliers on each side of the split and twist one hand away and the other toward the body, so the ends move sideways past each other. Never pull the ends apart into a wider circle, because the ring will not return to a true round. Slip the loop of the drop onto the open ring, then twist the ends back until they meet with no gap. The article on clasps and jump rings shows this movement, and there is general background on jump rings as well.
Thread the cord or a ready-made chain through the jump ring and let the drop slide to the center.
Two ways to finish the cord
Simple tied cord
Cut 32 in (81 cm) of cord. Hold the two ends together and tie one overhand knot with both strands about 3 in (7.5 cm) from the ends. The loop below the knot measures 32 − 3 − 3 = 26 in (66 cm), long enough to slip over most heads without a clasp. Try it on, tighten the knot and trim the tails.
Adjustable sliding knots
Cut 34 in (86 cm) of cord and lay the two ends side by side, pointing in opposite directions and overlapping by about 6 in (15 cm).
- Wrap. Take one end and wrap it loosely twice around the other strand, working back toward its own long side.
- Thread. Pass the end through both wraps, away from the pendant, and pull it snug. The knot should grip the strand it surrounds but still slide when pushed.
- Repeat. Turn the necklace around and tie the same knot with the other end around the opposite strand.
- Trim. Cut the tails to about 1/4 in (6 mm).
Each knot uses about 3 in (7.5 cm) of cord, so the loop is roughly 34 − 6 = 28 in (71 cm) with the knots pushed together. Sliding them apart shortens the necklace to about 16 in (41 cm). The necklace length guide shows where each length sits.
Watch out
If the loop or the jump ring has a gap, the pendant can work its way off. Close both fully and check them again after the first few wears.
If the loop goes wrong
- The loop is shaped like a teardrop. The tip of the wire was not gripped at its very end, so a straight piece was left over. Start the roll with the wire end flush with the jaws.
- The loop is too big or too small. The wire was gripped too far up or down the tapered jaws. Use the marker line as a guide.
- The beads wobble on the pin. The bend was made too far above the top bead. Bend closer to the bead on a fresh headpin.
Variations
Make a cluster by hanging three drops with stacks of 12 mm, 20 mm and 28 mm on the same jump ring. A matching pair of bead drop earrings uses exactly the same loop on two more headpins.
Beads, headpins and jump rings are small parts. Keep them away from young children and pets.
Frequently asked questions
How much wire is needed above the beads for a simple loop?
About 3/8 in (10 mm). Bend the wire to a right angle above the top bead, trim it to that length and roll it into a circle with round-nose pliers.
What can be done if the bead slides off the end of the headpin?
The bead hole is wider than the head of the pin. Thread a small 3 mm bead or a size 8/0 seed bead on first so it acts as a stopper under the larger bead.
How long should the cord be for a necklace with no clasp?
The loop has to pass over the head, so about 26 in (66 cm) works for many adults. Cut 32 in (81 cm) to allow 3 in at each end for the knot, and try it on before tightening.
Can the drop hang on a chain instead of cord?
Yes. Pass the chain through the jump ring, or open the jump ring sideways and close it around the middle link of the chain so the drop stays at the center.