Simple Beaded Necklace: An 18-Inch Strand for Beginners
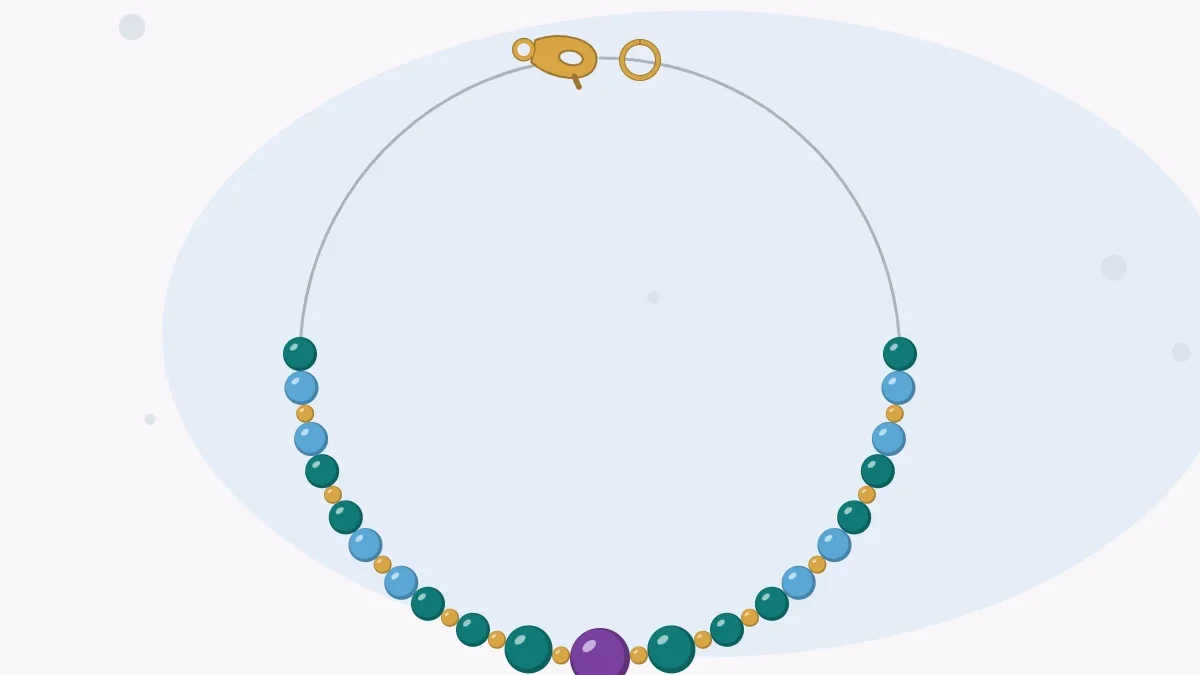
A symmetric 18 in necklace on flexible beading wire, planned from the center bead outward and finished with crimp tubes and a lobster clasp. The full length arithmetic is shown.
Tutorial at a glance
Materials
- 7 round beads, 8 mm
- 48 round beads, 6 mm
- 22 spacer beads, 4 mm
- 24 in (61 cm) of flexible beading wire, about 0.015 in (0.38 mm)
- 2 crimp tubes, 2 mm
- 1 lobster clasp and 1 soldered ring, about 6 mm
- Crimping pliers and wire cutters
- Bead mat or U-channel layout board, tape or a bead stopper
A simple beaded necklace is the natural next project after a bracelet with a clasp: the same wire, the same crimps, only a longer strand and a little more planning. This one finishes at 18 in (46 cm), a length that sits just below the collarbone on most adults, and it is planned from the center bead outward so the two sides match bead for bead.
What you need
- 7 round beads, 8 mm, for the focal section
- 48 round beads, 6 mm, for the sides
- 22 spacer beads, 4 mm (plain round or metal-look)
- Flexible beading wire, about 0.015 in (0.38 mm) thick: one piece 24 in (61 cm) long, which is the finished length plus 6 in (15 cm)
- 2 crimp tubes, 2 mm
- 1 lobster clasp and 1 soldered ring or sturdy closed jump ring, about 6 mm
- Crimping pliers and wire cutters
- A bead mat or a layout board with a U-shaped channel, plus a piece of tape or a bead stopper
- Three or four spare beads of each size, in case a hole is blocked or a bead is chipped
The guide to stringing materials explains why beading wire suits a strand like this.
Finished size and the length arithmetic
The clasp end takes up space, so the beads never fill the whole 18 in. A lobster clasp, its ring and the two crimps add up to about 1 in (25 mm). That leaves a beaded length of 17 in, which is 17 × 25.4 = about 432 mm.
Now fill those 432 mm from the middle:
- Center section: 7 focal beads at 8 mm = 56 mm, with a 4 mm spacer in each of the 6 gaps between them = 24 mm. Total 80 mm.
- Each side: one repeat is 1 spacer plus 3 beads of 6 mm, which is 4 + 18 = 22 mm. Eight repeats make 176 mm per side, or 352 mm for both sides.
- Whole strand: 80 + 352 = 432 mm, or 17 in. Add the 1 in clasp section and the necklace finishes at 18 in.
The bead totals follow from the same sums: 7 focal beads, 2 × 8 × 3 = 48 beads of 6 mm, and 6 + 16 = 22 spacers, 77 beads in all.
Making it shorter or longer
The easiest way to resize is to remove or add one repeat on each side, which changes the strand by 44 mm (about 1.75 in). For a smaller change, add one 6 mm bead at each end for an extra 12 mm, roughly half an inch.
| Repeats per side | Beaded length | Finished length | Beads needed |
|---|---|---|---|
| 7 | 388 mm (about 15.3 in) | About 16.3 in (41 cm) | 7 focal, 42 of 6 mm, 20 spacers |
| 8 | 432 mm (17 in) | 18 in (46 cm) | 7 focal, 48 of 6 mm, 22 spacers |
| 9 | 476 mm (about 18.7 in) | About 19.7 in (50 cm) | 7 focal, 54 of 6 mm, 24 spacers |
Clasps differ, so lay the clasp, ring and crimps in a line and measure them before trusting the 1 in figure. The necklace length guide shows where each length sits if 18 in is not the right choice.
Plan the layout from the center
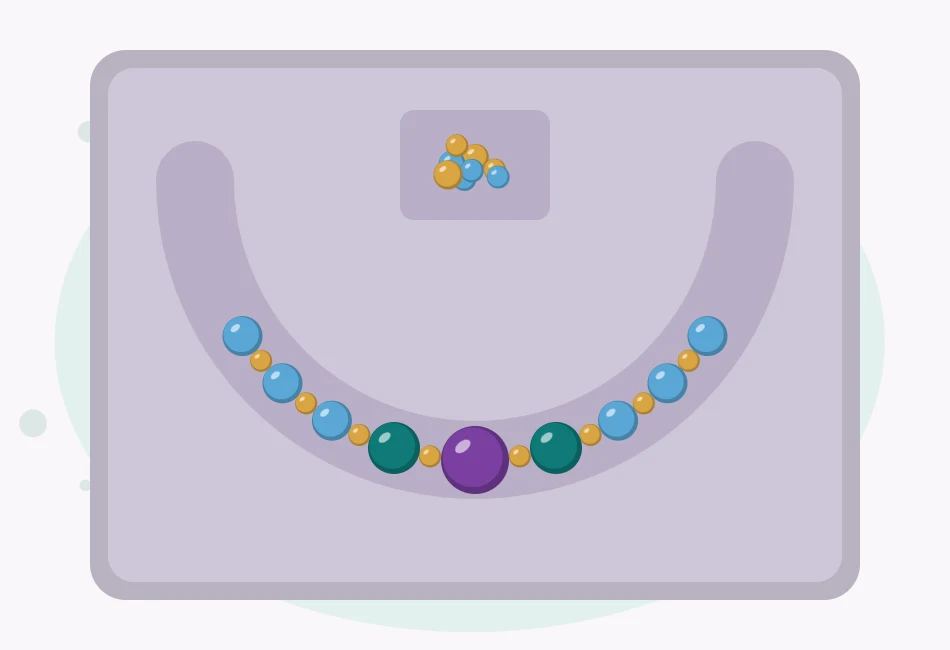
Working from the middle is what keeps a symmetric strand symmetric. Place the fourth focal bead at the bottom of the U, then add to the left and right in turn.
Tip
Count the sides in pairs. After each repeat goes down on the left, lay its twin on the right before moving on. A missing bead is far easier to spot on the mat than on the wire.
Step by step
- Lay out the center. Set down one 8 mm bead, then a spacer and another 8 mm bead on each side, until 7 focal beads and 6 spacers form the bottom of the curve.
- Build the sides. On each side add a spacer followed by three 6 mm beads. Repeat until each side has 8 repeats. Both ends of the layout should finish on a 6 mm bead.
- Measure the layout. Run a tape measure along the row. It should read close to 17 in (43 cm). Adjust now if it does not.
- Attach the clasp. Thread one crimp tube onto the wire, then the clasp. Bring the wire back down through the crimp tube, leaving a tail of about 1 in (2.5 cm) and a small loop that lets the clasp swing freely. Close the crimp in two stages, a crease and then a fold, as shown in the guide to using crimp beads and crimp tubes.
- String the beads. Pick the beads up in order from one end of the layout to the other. Slide the first four or five beads over both the main wire and the short tail so the tail is hidden.
- Check the count and the drape. Clip a bead stopper or fold tape over the open end. Hold the strand up in a U: the center focal bead should hang at the lowest point with equal sides.
- Finish the second end. Thread the second crimp tube and the ring, then pass the wire back through the crimp and the last three beads. Pull the slack out, leaving a gap of about 1 mm between the beads and the crimp, then crimp and trim the tail close with the cutters.
Watch out
Do not pull the wire tight before the last crimp. A strand with no slack cannot curve around the neck: it stands out stiffly and puts strain on the crimps. Bend the strand into a circle first, then set the crimp.
If something looks wrong
- The center bead hangs off to one side. One side has an extra bead. Count the 6 mm beads on each side: there should be 24.
- Bare wire shows near the clasp. Too much slack was left. If the crimp is already closed, cut it off, restring that end and use a new crimp tube.
- The strand kinks instead of curving. It was strung too tight, or the wire was bent sharply while working. Kinks in beading wire do not come out, so start again with a fresh length.
A graduated variation
Swap the outer two repeats on each side for 4 mm beads only. Two repeats cover 44 mm, so 11 beads of 4 mm take their place and the length stays the same. The method is ordinary bead stringing, so the same arithmetic works for any mix of sizes.
New to tools and findings? The beading for beginners guide lists what a first project needs.
Beads, crimps and clasps are small parts. Keep them away from young children and pets while working.
Frequently asked questions
How many beads does an 18 in necklace need?
It depends on the bead sizes. Allowing about 1 in for the clasp section, the beaded length is 17 in, or about 432 mm. This design fills it with 7 beads of 8 mm, 48 beads of 6 mm and 22 spacers of 4 mm. A strand of 6 mm beads alone would take about 72.
How much beading wire should be cut for an 18 in necklace?
Cut the finished length plus about 6 in (15 cm), so 24 in (61 cm) for this project. The extra gives enough wire to loop through the clasp and ring and to tuck each tail back through a few beads.
Why plan a necklace from the center outward?
Starting at the center bead and adding the same bead to both sides in turn keeps the strand symmetric. Any change in length then happens at the two ends, near the clasp, where it does not disturb the pattern at the front.
Why does the finished necklace feel stiff?
The wire was pulled too tight before the second crimp was closed. Leave about 1 mm of slack and bend the strand into a circle before crimping so the beads have room to move as the necklace curves.